The Dress

After spending a lot of time making drapes, I wanted to see if I could sew something that wasn’t rectangle. So, I attempted to sew a dress, using an idea that was in my head. This isn’t the first dress I’ve attempted; it is the second one. I was in high school, and I got so frustrated with the first dress, my sister ended up finishing it for me.

To make a dress: First, I found pretty denim fabric. It was on sale for 70% off, a definite plus. I purchased 1.5 yards of denim fabric. Had no clue how much I needed. A pattern for another dress I looked at said it needed 1.5 yards.

Professional seamstress recommends washing the material first. I did not, I thought even if I stitch the edges of the fabric, it would unravel in the wash. I did iron the material. I have learned that ironing is a key component to sewing.

For the top of the dress width, I took my measurements, hips, waist, and chest to determine which was the largest. I wanted to be able to pull the dress over my largest body part, I added a couple of inches to the largest of these measurements for the seams. I divided this measurement by 2 to get the cut width for the top of the dress.

Determining the length of the dress was next. I took a measurement from my arm pit to the floor. Subtracted a couple of inches so it would be above my ankles. Keeping in mind, the dress would have at least a 3/4″ hem at top and bottom.

It occurred to me at this point if I wanted to move in the dress, the dress would need to have some flare to it. Or else, I would not be able to sit, bend over, kneel down, or walk normally. To add the flare, the bottom needed to be wider than the top. I added 8″ inches to the top width measurement for the bottom of the dress measurement. I then divided that measure by 2 to get the cut width for the bottom of the dress.

Here is the pattern I had in my head for the dress.

The length of the dress with seams was shorter than the length of the material. My first cut to the fabric was for the length of the dress. I wanted to make a belt for the dress, and I could use the extra fabric for the belt.

I folded the material in half and tried to match the pattern. Okay, I am not that good of a seamstress. That endeavor was quick abandoned.

I marked the top and bottom of dress measurements onto the center of the fabric and drew a chalk line from the top of the fabric to the bottom of the fabric on both sides. I pinned both sides, checked that the top and bottom measurements were correct, and cut the material.

I sewed the hem on the bottoms of both pieces of fabric.

I needed some shoulder straps to hold the dress up. I am not flexible enough to determine the exact length of the shoulder straps I would need, so I decided to make straps I could ties. I cut eight pieces from the fabric scraps about 18″ long and 3″ wide. After sewing the fabric together, I had four 2″ straps.

How do I determine where to place the straps on the dress? I could Google is, but every woman is a different size. Then I realized; I had the measurement on me, I would measure the distance between my bra straps. I took this measurement, center the measurement on the top of the dress and marked the location for the straps on both pieces of fabric. I pinned the straps into the top seam of the dress, then I sewed the seams at the top on both pieces of fabric, which sewed the straps into the seam.

I then sewed the sides of the dress together. I officially, had a dress.

However, my last task was to sew the belt. The belt finished width was 2.5″ wide and 54″ long. Yes, I used the entire width of the fabric, plus some to make the belt. I wanted to be able to wrap the belt around the waist multiple times.
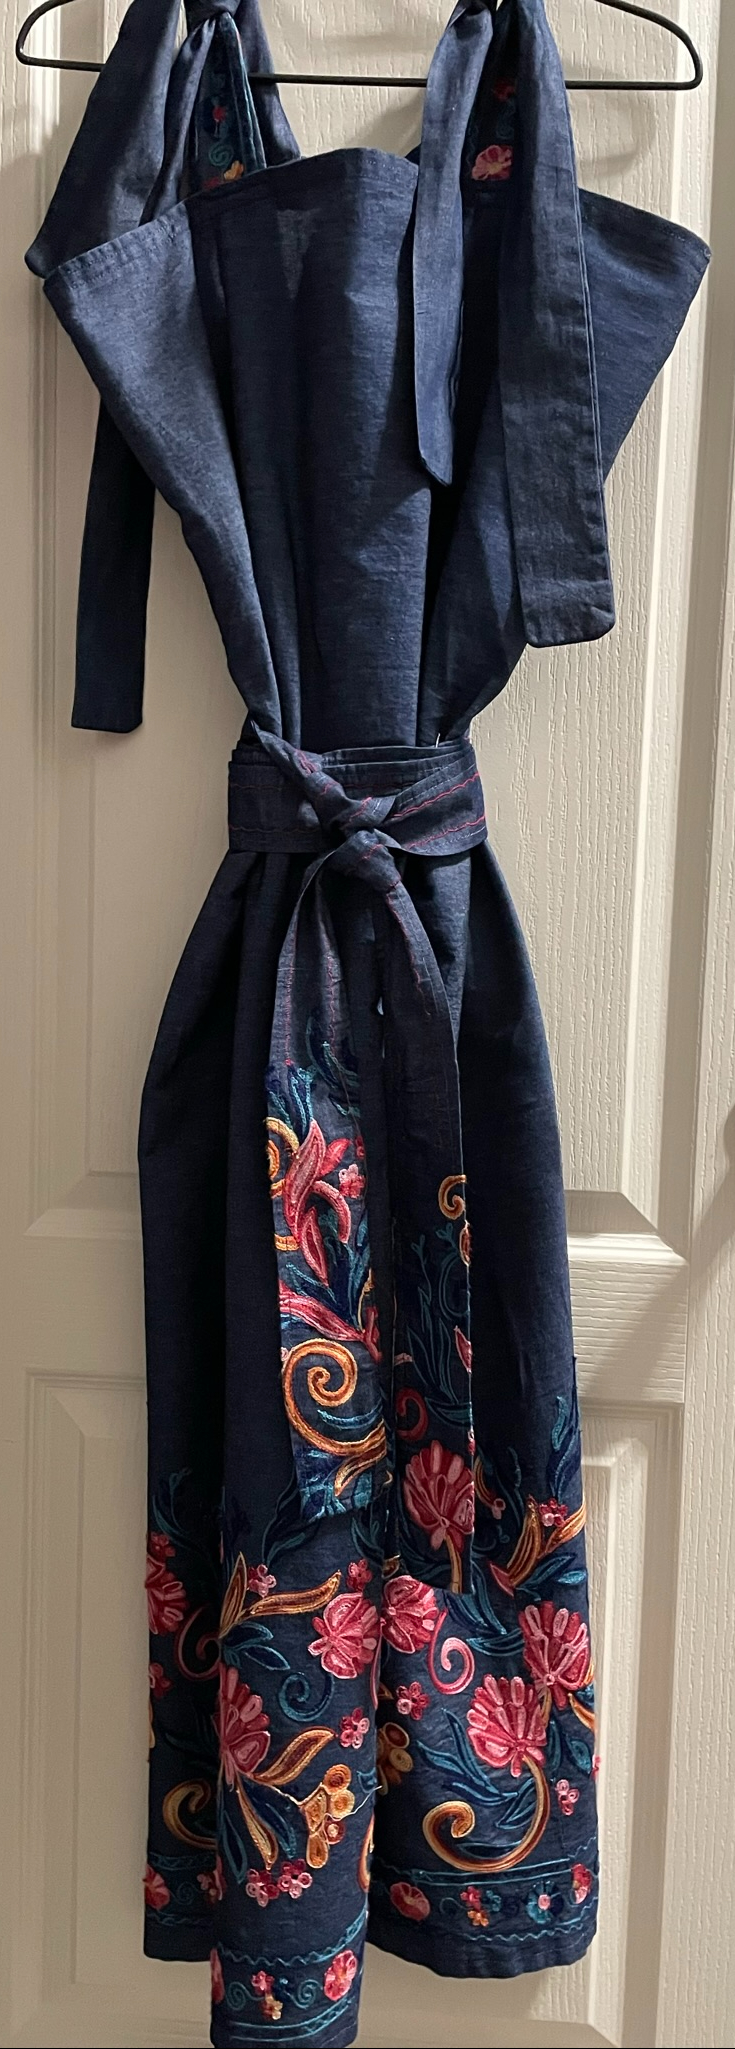
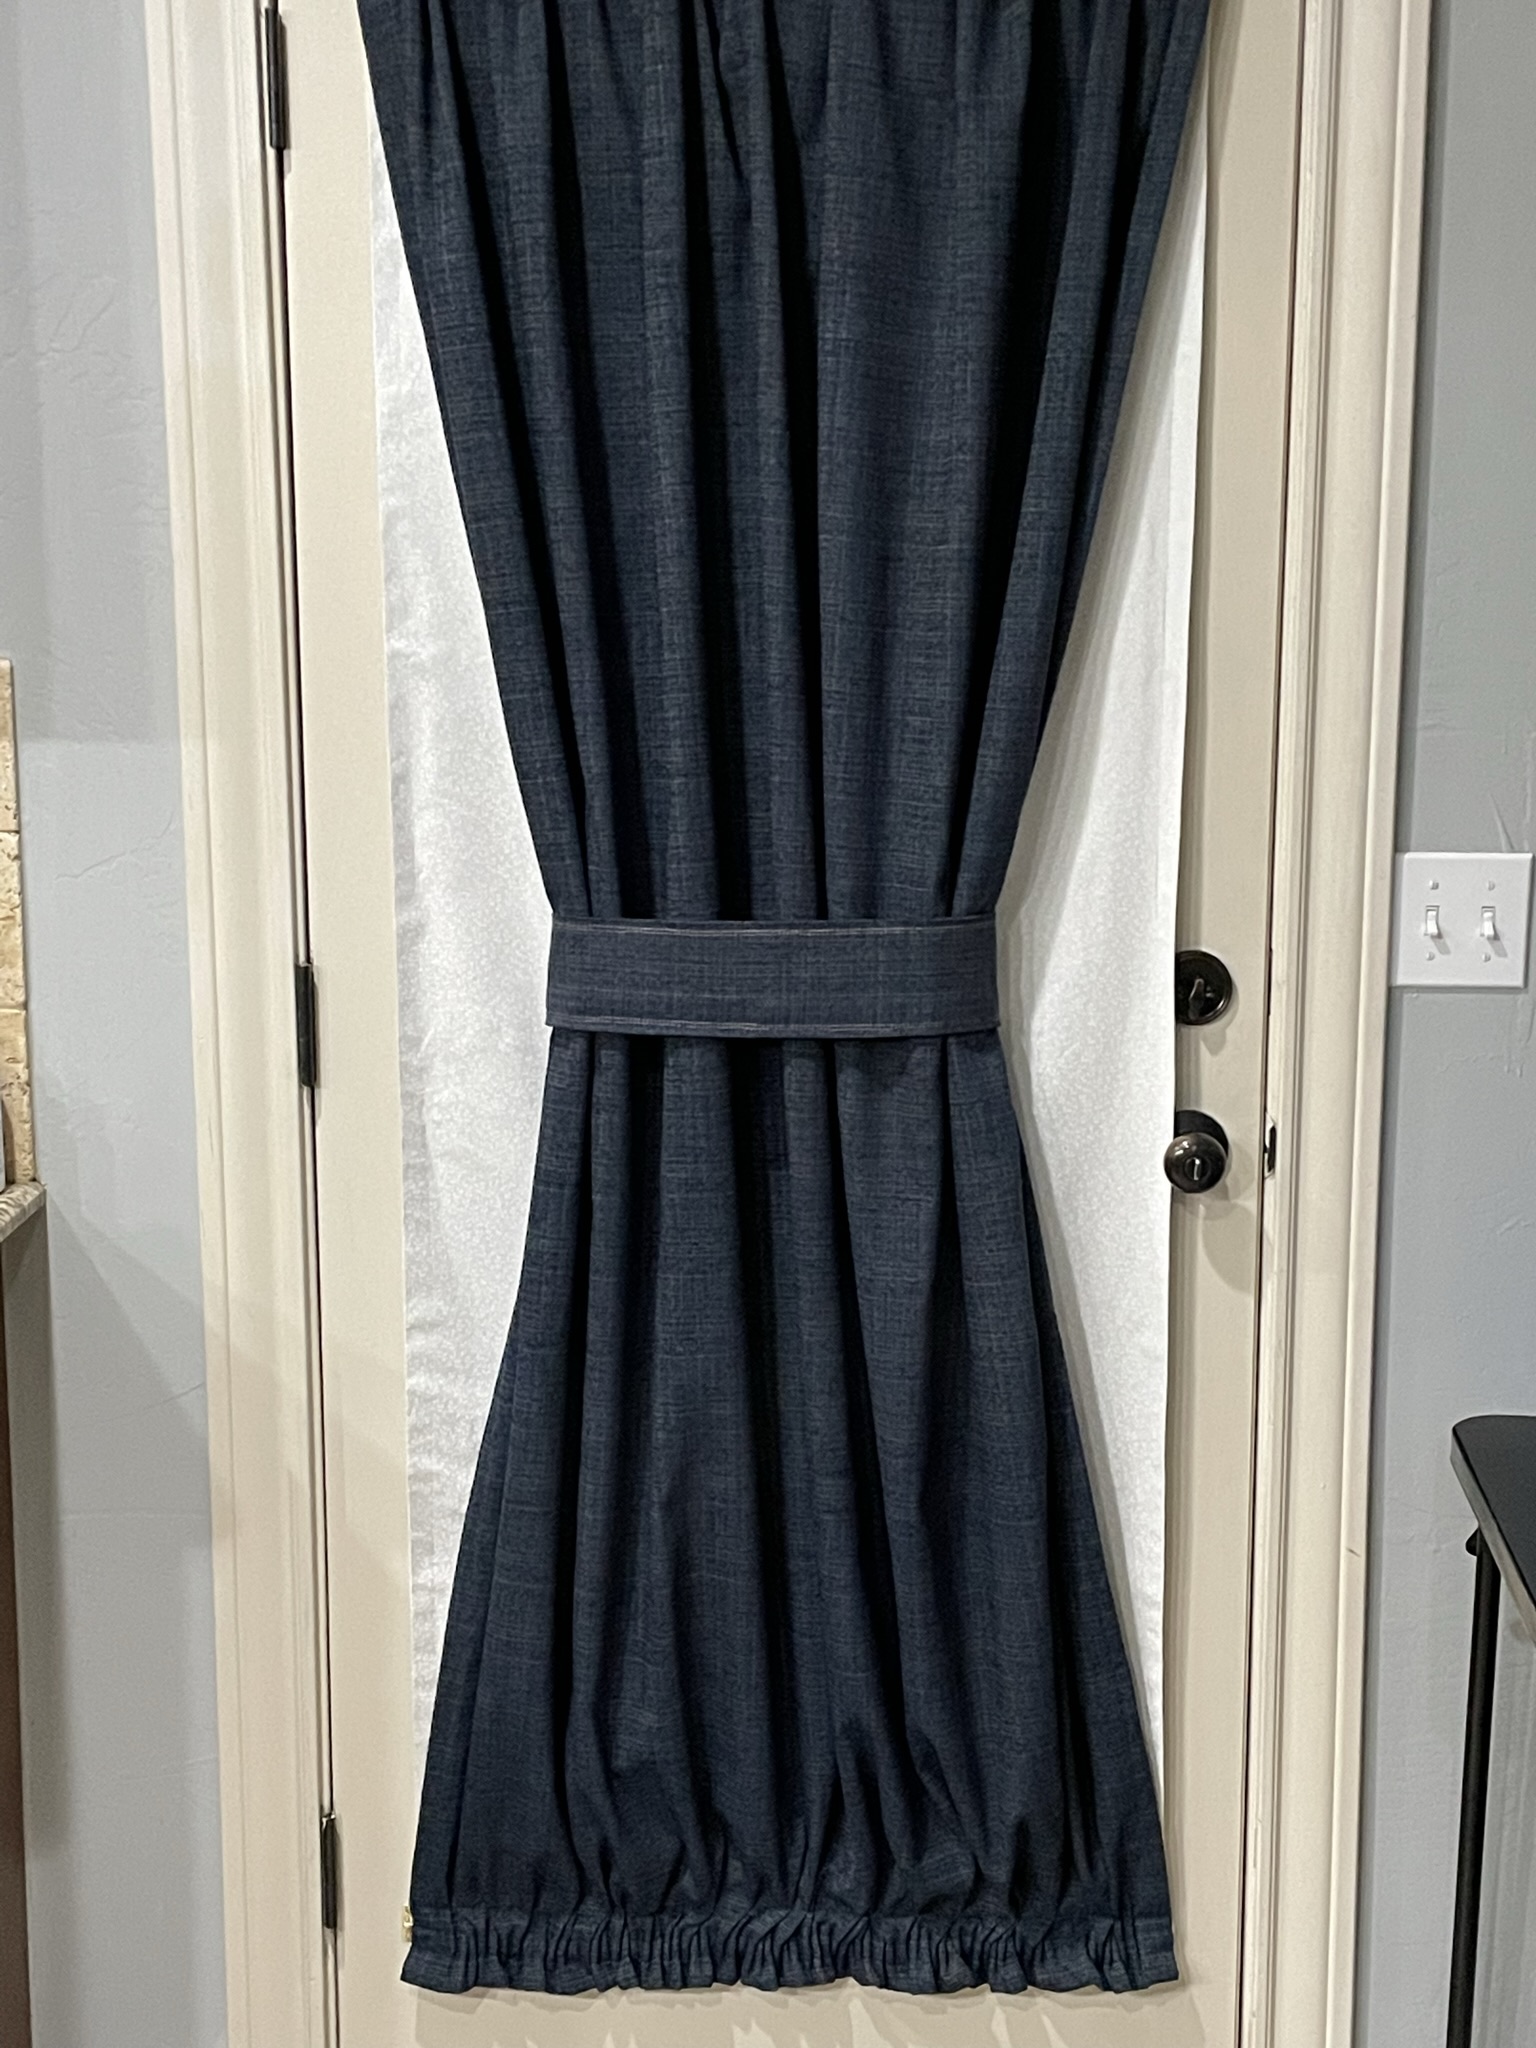
The Dress:

Drapery

In October, I moved into a new house. The house faces east, so the morning sun coming through the windows (or cracks in the blinds) was blinding. Especially the windows over and along the front door let in a lot of light, I couldn’t look east or watch TV without dashing sun rays. In the bedrooms, I wanted drapes for the added privacy. I have a sewing machine and I can almost sew a straight line, so making them myself was an option.

The problem, working with material exceeding 80 inches long and almost as wide is difficult. I visited Joann’s Fabric Store and Hobby Lobby, but none of their fabric said, “buy me.” None of the drapes at stores like Bed, Bath and Beyond, J.C. Penney’s, Kohls… fit my windows. Remember the front door, to cover those windows I would have to make them.

After weeks and weeks of internet searching and looking at fabric, I found a solution. It was https://bestfabricstore.com/. They sold a wide variety of fabric, and they would also make the drapes out of the fabric I select. This would be perfect if the drapes were well made.

First, I order about 15 fabric samples from Best Fabric Store out of Winfield, Al. The samples arrived in a timely manner and looking them over, I had a good picture of the color, design, weight and quality of the fabric.

Now for the test: I order one set (two panels) for the “weight room” window. They said it would take about three weeks, and the drapes arrived before their estimate. Below is the first drapery I ordered from Best Fabric Store. Yes, I did want a rod pocket drape.

The drapery looked good, it was package well, nicely folded, and the blackout material was of high quality and did its job.

Next, I ordered drapes for the Master Bedroom, Breakfast Nook, and the other bedroom. The house has windows in most of the doors and because it is an “open concept house”, the living room, breakfast nook, and entry are not separated by walls. Getting all the drapes to match in this area was important to me. Along with ordering the drapes, I ordered about 15 yards of fabric to make the drapes for the five doors that had windows. The blackout material I picked up at JoAnn’s and the white fabric came from Hobby Lobby.

The Closet:

It is freezing cold in the closet. I haven’t figured out why. The temperature in the closet is about 10 degrees colder than the other rooms in the house. It also has 3 small windows in the closet. Maybe adding some shades, would help stabilize the temperature. While I was waiting for the drapes and fabric to come in, I made some shades. Plus, I needed to practice sewing.

The Other Bedroom

Drapes Made by Best Fabric: The window is the tallest in the house.

Master Bedroom:

Drapes by Best Fabric:

Door Window Cover by Sarahcath: Note – the matching material. I considered making the curtain straight, but I decided instead to use the entire fabric width.

Breakfast Nook:

Drapes by Best Fabric:

Front Door:

Window Covering by Sarahcath: The fabric matches the Breakfast Nook, since they are on the same wall.

I wanted the hourglass shape to the drapes on the side windows. So I made a straight panel to cover the window with blackout, then I sewed the curtains to the panel. The drapes are twice as wide and the panel.

For the upper window, also known as an eyebrow window (it is not a half oval window), I attached wire clips around the window approximately 6 to 8 inches apart. I purchased a rubber coated galvanized wire to hang the drapes on. I did not believe a plastic tubing will hold the weight. I sewed Roman Shade Tape to back, both top and bottom, of the window treatment. I feed the wire through the hops on the top and snap it into the wire clips. I feed a cord through the hops on the bottom of the window treatment to gather the fabric in the center.

Family Room:

Window Covering by Sarahcath: The fabric matches the Breakfast Nook, since they are on the same wall. Note that fabric matches the front door.

Kitchen Door:

Window Covering by Sarahcath: Same design as the other doors.

Office:

Window Covering by Sarahcath: I wanted them flat. I did not want them touching the wires under the desk.

Now on to my next project.