3D Printing – The Easter Egg

Yesterday, I designed an Easter Egg using Tinkercad.  Today, I printed the Easter Egg.  Creating the Egg in Tinkercad is easy.  They have a egg object.  Hollowing out the egg is easy; copy egg, reduce the size, make it a hole, align the solid egg with the hole egg, and group.

20180329_154702.jpg

Making the two egg halves with the crack was more complicated than making the chick.  The chick is two circles for the body, two circles for the eyes, two flatten and stretched trapezoid for the wings, the heart shape for the head, and Tinkercad’s  chicken foot object for the feet.

To see how I created the crack in the egg, check it out here.  Note:  I am working on other cool chicks, so the design my change.

20180329_154747.jpg

I probably could have made the chicken bigger, maybe I will.

20180329_154733.jpg20180329_154756.jpg

The egg was printed on Ultimaker 2+ printer.  I read that beta version of the Cura Software allows more control over supports.  Yay!

Tinkercad – the free, online 3D CAD app

Rice Krispy Train

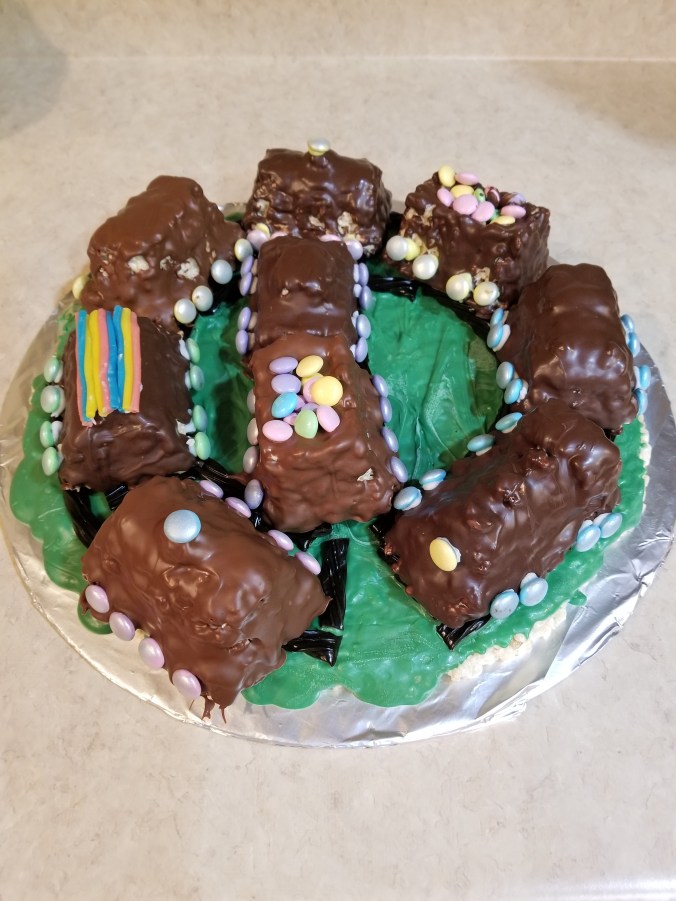
Today’s project was to make a Rice Krispy Train. Someone in the household needed a snack for work, so I came up with this idea.

Step One: Buy a Nordic Ware Train pan and wait for Amazon to deliver said pan.

Step Two:  Buy the Rice Krispy, Marshmallows, M&Ms, chocolate, spray icing.

Step Threes:  Unpack the box from Amazon and say “So, pretty!  Yay!”  Wash the pan.

Step Four:  Wait until Wednesday, so the “someone” can bring it to work on Thursday.

Step Five:  Make the Rice Krispy Treat mixture and spray the pan with pam.  Stuff the Rice Krispy treat mixture into the pan.

Step Six:  Make more Rice Krispy Treat mixture, because the first batch did not fill up the pan.

Step Seven:  Fill the pan with mixture and use the left over to make ground.

Step Eight:  Go to Walmart to buy more decorations because now you have ground.

Step Nine: Buy green candy melt and licorice.

Step Ten:  Cut licorice, melt green candy melt, pour over ground, and spread out.  Wait, ground is not smooth.  Make little slashes in candy melt to make it look like grass.  Put licorice on candy melt so it looks like railroad tracks.  That candy melt dried quickly.

Step Eleven:  Microwave first batch of chocolate (dark chocolate) and spoon over Rice Krispy Train cars.  That chocolate is drying fast.  This is as much fun and pouring paint over canvases.

Step Twelve:  Microwave second batch of chocolate (milk chocolate) and spoon over Rice Krispy Train cars.  This chocolate is not drying.  Time to wait to see if chocolate dries.

Step Thirteen:  Put wheels on train.  (The M&M that were sprayed with Silver Icing – oh, that was done around step five.)  The milk chocolate cars have not dried – put wheels on those trains cars first.

Step Fourteen: Put remaining decoration on dried train cars, and place on train track.

Step Fifteen:  Talk to the cable repairman, wait while his fixes the cable.

Step Sixteen:  Yay!  The other cars are dry.  Place on train track.

Step Seventeen:  Take pictures.

20180314_134745.jpg20180314_134758.jpg20180314_134808.jpg20180314_134820.jpg20180314_134841.jpg

The Rice Krispy recipe is on the back of boxes of Rice Krispy and the Marshmallows bags.

The melting instructions for the candy melt and chocolate are on the back of the bag/container.

Not the best train in the world. If you want to see a nice train, click here.

Amazon Echo Show Privacy Shield

I do not believe that Amazon is spying on us, but there are a numerous hackers in the world.  And, getting dressed in front of a camera….

This privacy shield is for the Amazon Echo Show to cover the camera.  It will put the device to sleep because it can not detect movement in the room.   You can still access the three buttons on top of the device with the shield installed.

20180306_072005.jpg

20180306_072014.jpg

The Camera is in the top center of the device.

20180305_163757.jpg20180305_163735.jpg

I put “Alexa” on the shield because that is the wake up word for the AI.

20180305_163839.jpg

This gadget was made with Tinkercad, and is published on Thingiverse and YouMagine.

Tinkercad, the free, online 3D design and 3D printing app.

Clackers

It all started on Facebook and someone saying “Do you remember…”  Yes, I do remember Clackers, they were fun to play with, but dangerous (will at least in today’s world.)  We would get hit with one or both of the glass balls and go ouch or whoops.  However, in today’s world, they are safer than the Tide Pod challenge.

My 3D printer and I were not getting along, so we both took a break from each other.  After the Facebook posting, I decided it was time to put the print back to work.  And, one of the simplest thinks to design and print would be a ball with at hole in the middle.

I used Tinkercad to design it.  5cm ball with a hole in the middle.  I then did the thing I been regretting for a while, I cleaned, oiled and balanced the printer.  The first print failed, the item was not adhering to build plate.  Failure.  I rebalanced the build plate.  Failure.  I removed the build plate and cleaned it with soap and warm water and rebalanced the build plate.  Success, I had one ball for my clackers, so I printed a second one.

The string is only nylon string with a loop tied at the top and a knot at the end of each ball.

My family have official declared me weird.


Stand For Fluid Painting

Fluid Painting can be messy.  You pour paint over the canvas and it drips over the edges.  What a mess!  I am not a clean freak, just a person working in limited space and I need my table to draw and do other things.  So far, I have limited myself to 4″ canvases, and I have a 3D printer sitting right next to my work table… I decided I would design and print a stand for my pour paintings.

The maximum print size of my Ultimaker 3d printer is around 8 inches, width and length.  The height can go up to around 12 inches.  So, this project was perfect.

The catch basin is 5″ square, or in my design world 127mm, and 1″ (25.4mm) high.  Just in case different colors dropped from the different edges of the canvas, I divided off the catch basin and add drain notches.  It didn’t need it, but I placed pegs to hold the stand, and divided off this compartment to keep paint off of the stand.  It took around 11 hours to print.

20180228_134813.jpg20180228_134849.jpg

The design was done in Tinkercad and export as a STL file.  The file was imported into Cura and where a .gcode file was made.  I used the “normal” setting because the “fine” setting indicated it would take 23 hours to print.  Therefore, some warping occurred because of the setting and because I select not to add a Brim support.

The stand was also designed in Tinkercad.  It is 3 inches high.  The break in the structure allows for air to flow under the canvas.  It took around 4 hours to print.

20180228_134859.jpg

The notches on top of the stand, allows me to put some other type of support under the canvas to lift off, in case I want to reuse the stand before drying is complete.

20180228_135052.jpg

The finished product.

20180228_135154.jpg20180228_135305.jpg20180228_135345.jpg

The colors, yes I used Color Shift paint by Folk Art and grab the black and 4 other colors.

20180228_150626-2.jpg

The test.

Ok, some of the holes leaked.  The center dividers should have been larger and I did not pour out of the basin as I expected.  I do not know if I am going to tweak the design and reprint it or not.  Probably.

20180228_153210.jpg

I did get a cup (one ounce) out of the basin.  It should go nicely with another pour.

20180228_154257.jpg