King Cake Recipe

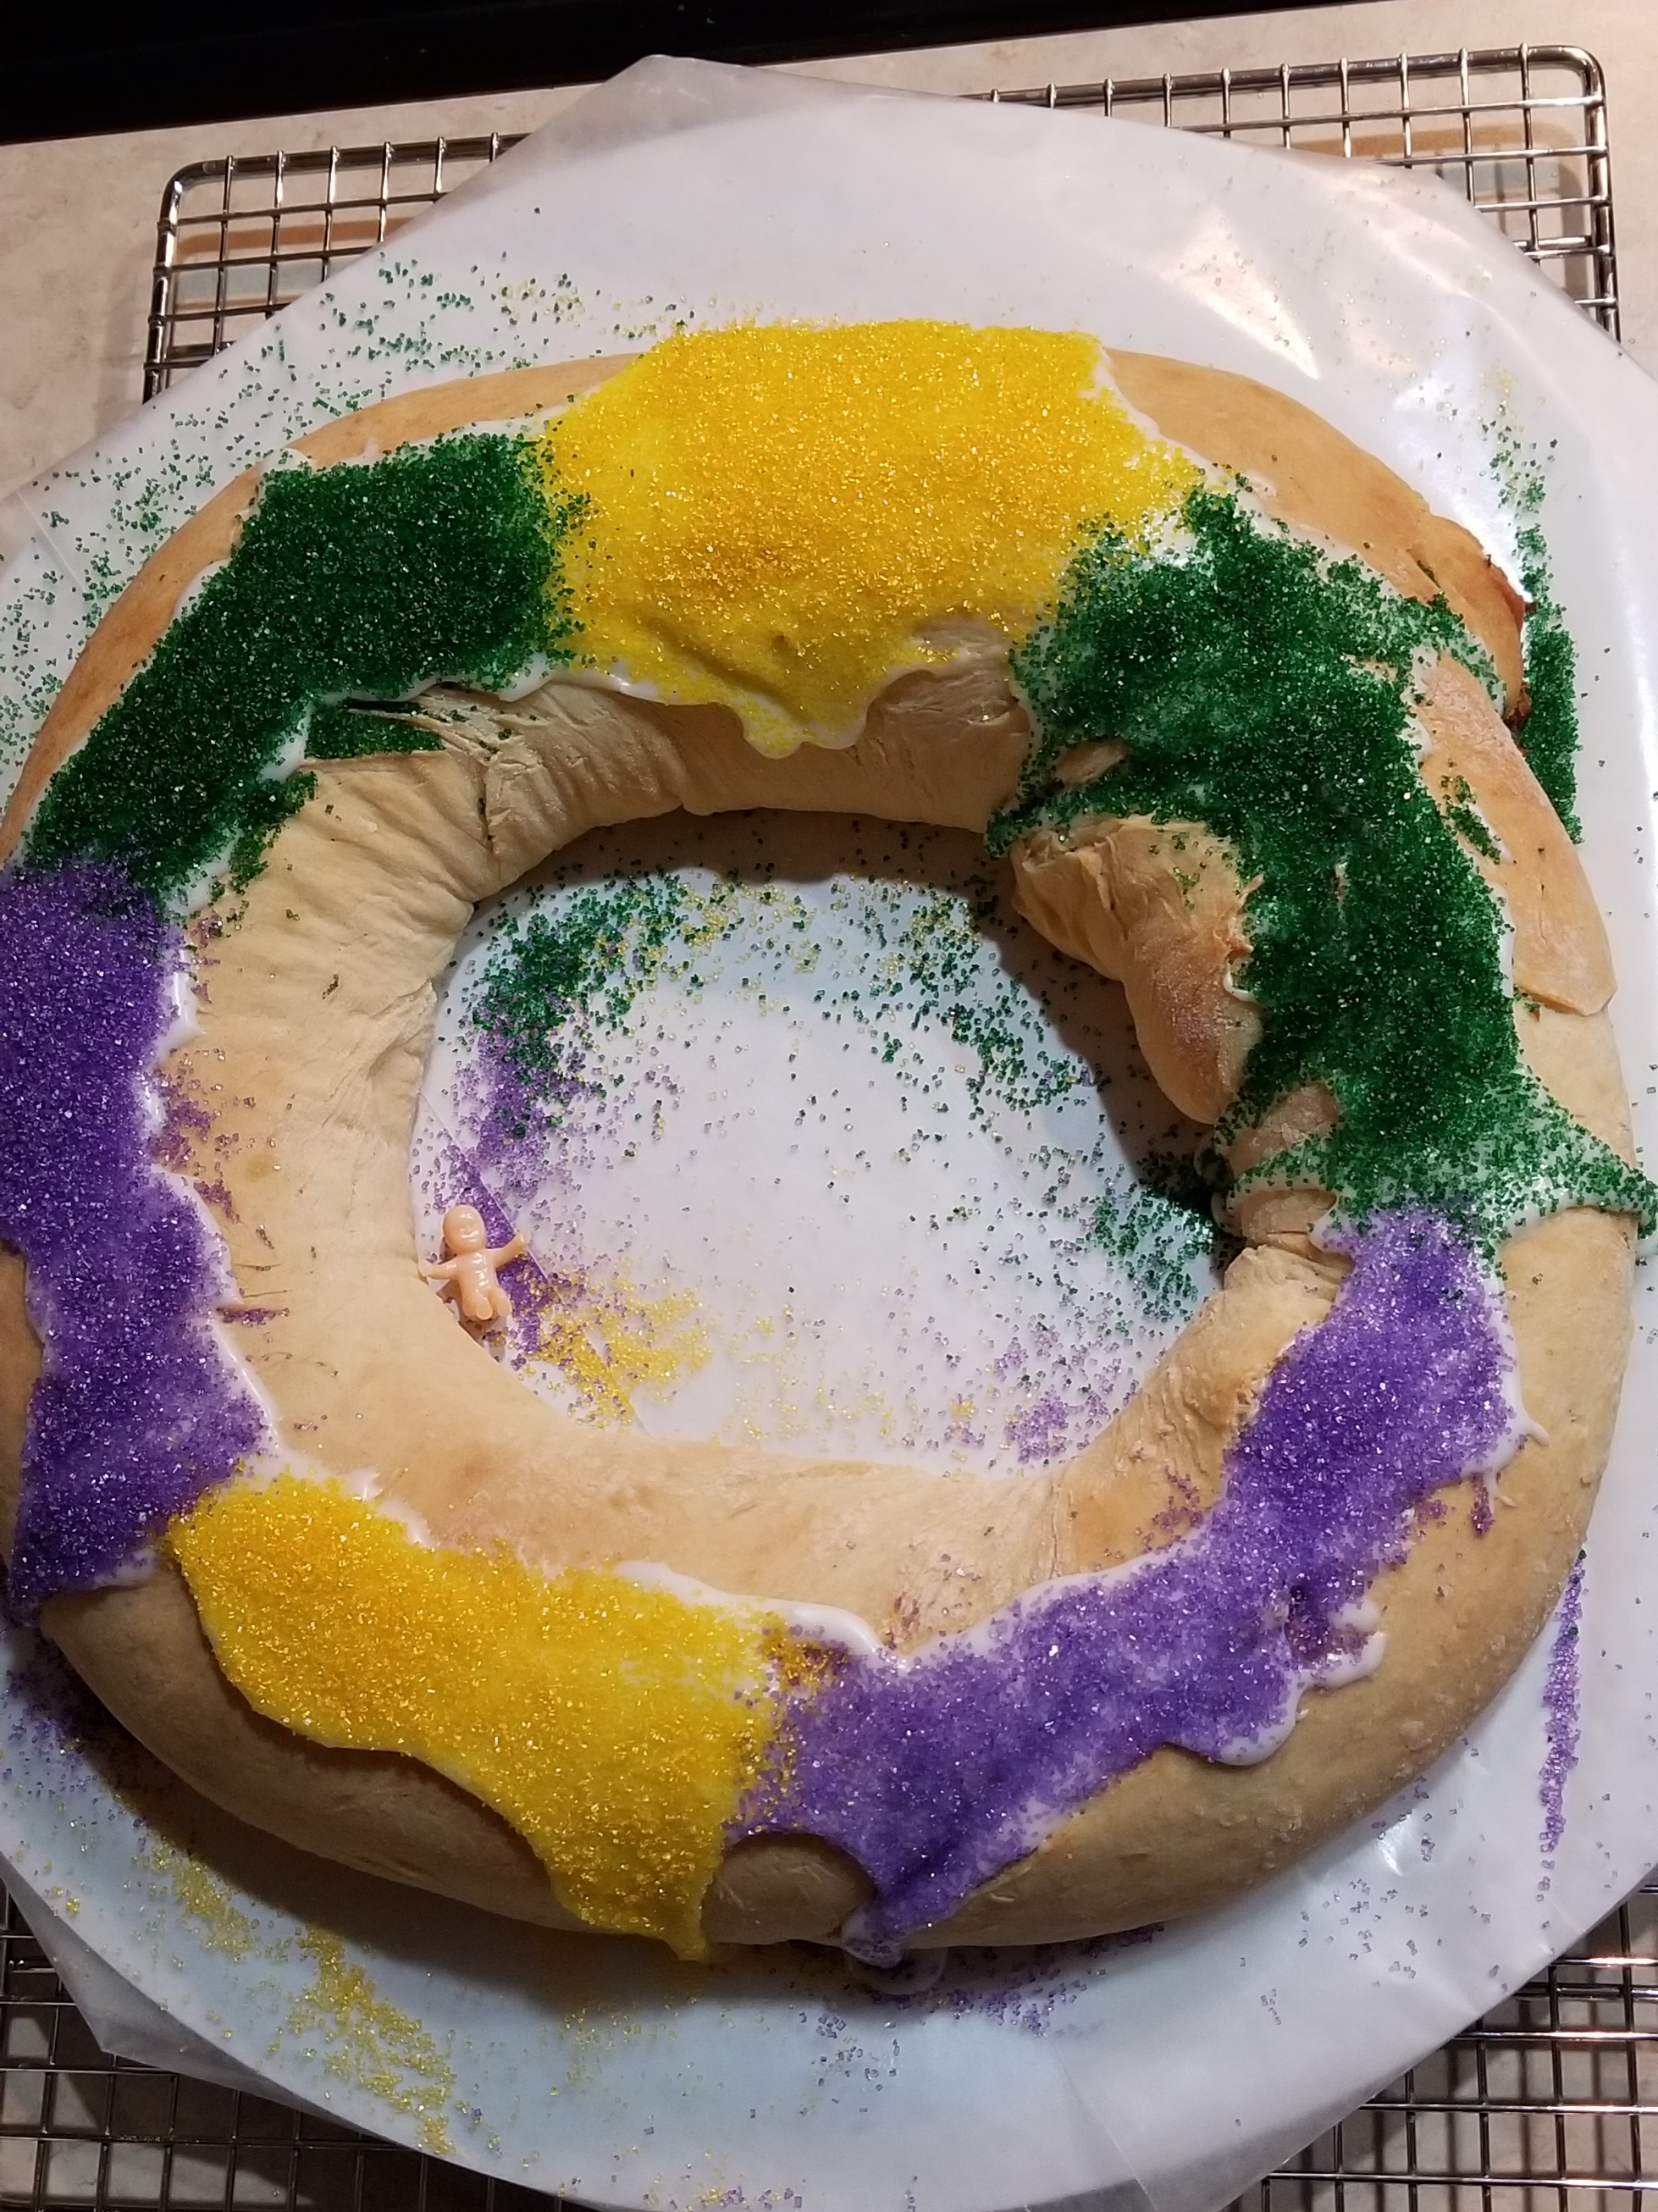
When you are from Louisiana, but don’t currently live in Louisiana, and King Cake Season rolls around you need a King Cake. You have two options available for your King Cake need: 1) Spend $50 to have one ship to you. Oh, they are so good, it may be worth it. Or, 2) Make your own King Cake. I decided to make my own.

Below is my recipe for a King Cake:

Ingredients:

  • A large cookie sheet
  • A heavy stand mixer with a dough hook. (A hand mixture will work but will take a lot more work.)
  • A serving platter large enough to hold the King Cake. (I buy the 14″ round cake boards made from cardboard)
  • Candy Thermometer
  • All Purpose Flour
  • 1 cup of Butter – room temperature; 1/4 cup of butter melted
  • Egg – room temperature
  • Hot Water (that is why you need the Candy Thermometer)
  • Powder Sugar (just in case)
  • Mam Papaul’s King Cake Mix – Yes, I just buy the mix directly from the company. It comes with everything you need; cake mix, filing, icing, colored sugar, and plastic baby.

Instructions:

Follow the directions on the back of the box. You could try just using the bag method, but I had the bag break during the kneading process and had to switch to the hand mixer. That was a lot of work. I now use my stand mixer.

The extra flour is for light dusting during the rolling and shaping stage. If you add too much water to the icing, you can thicken it up by adding some extra powder sugar and stirring well.

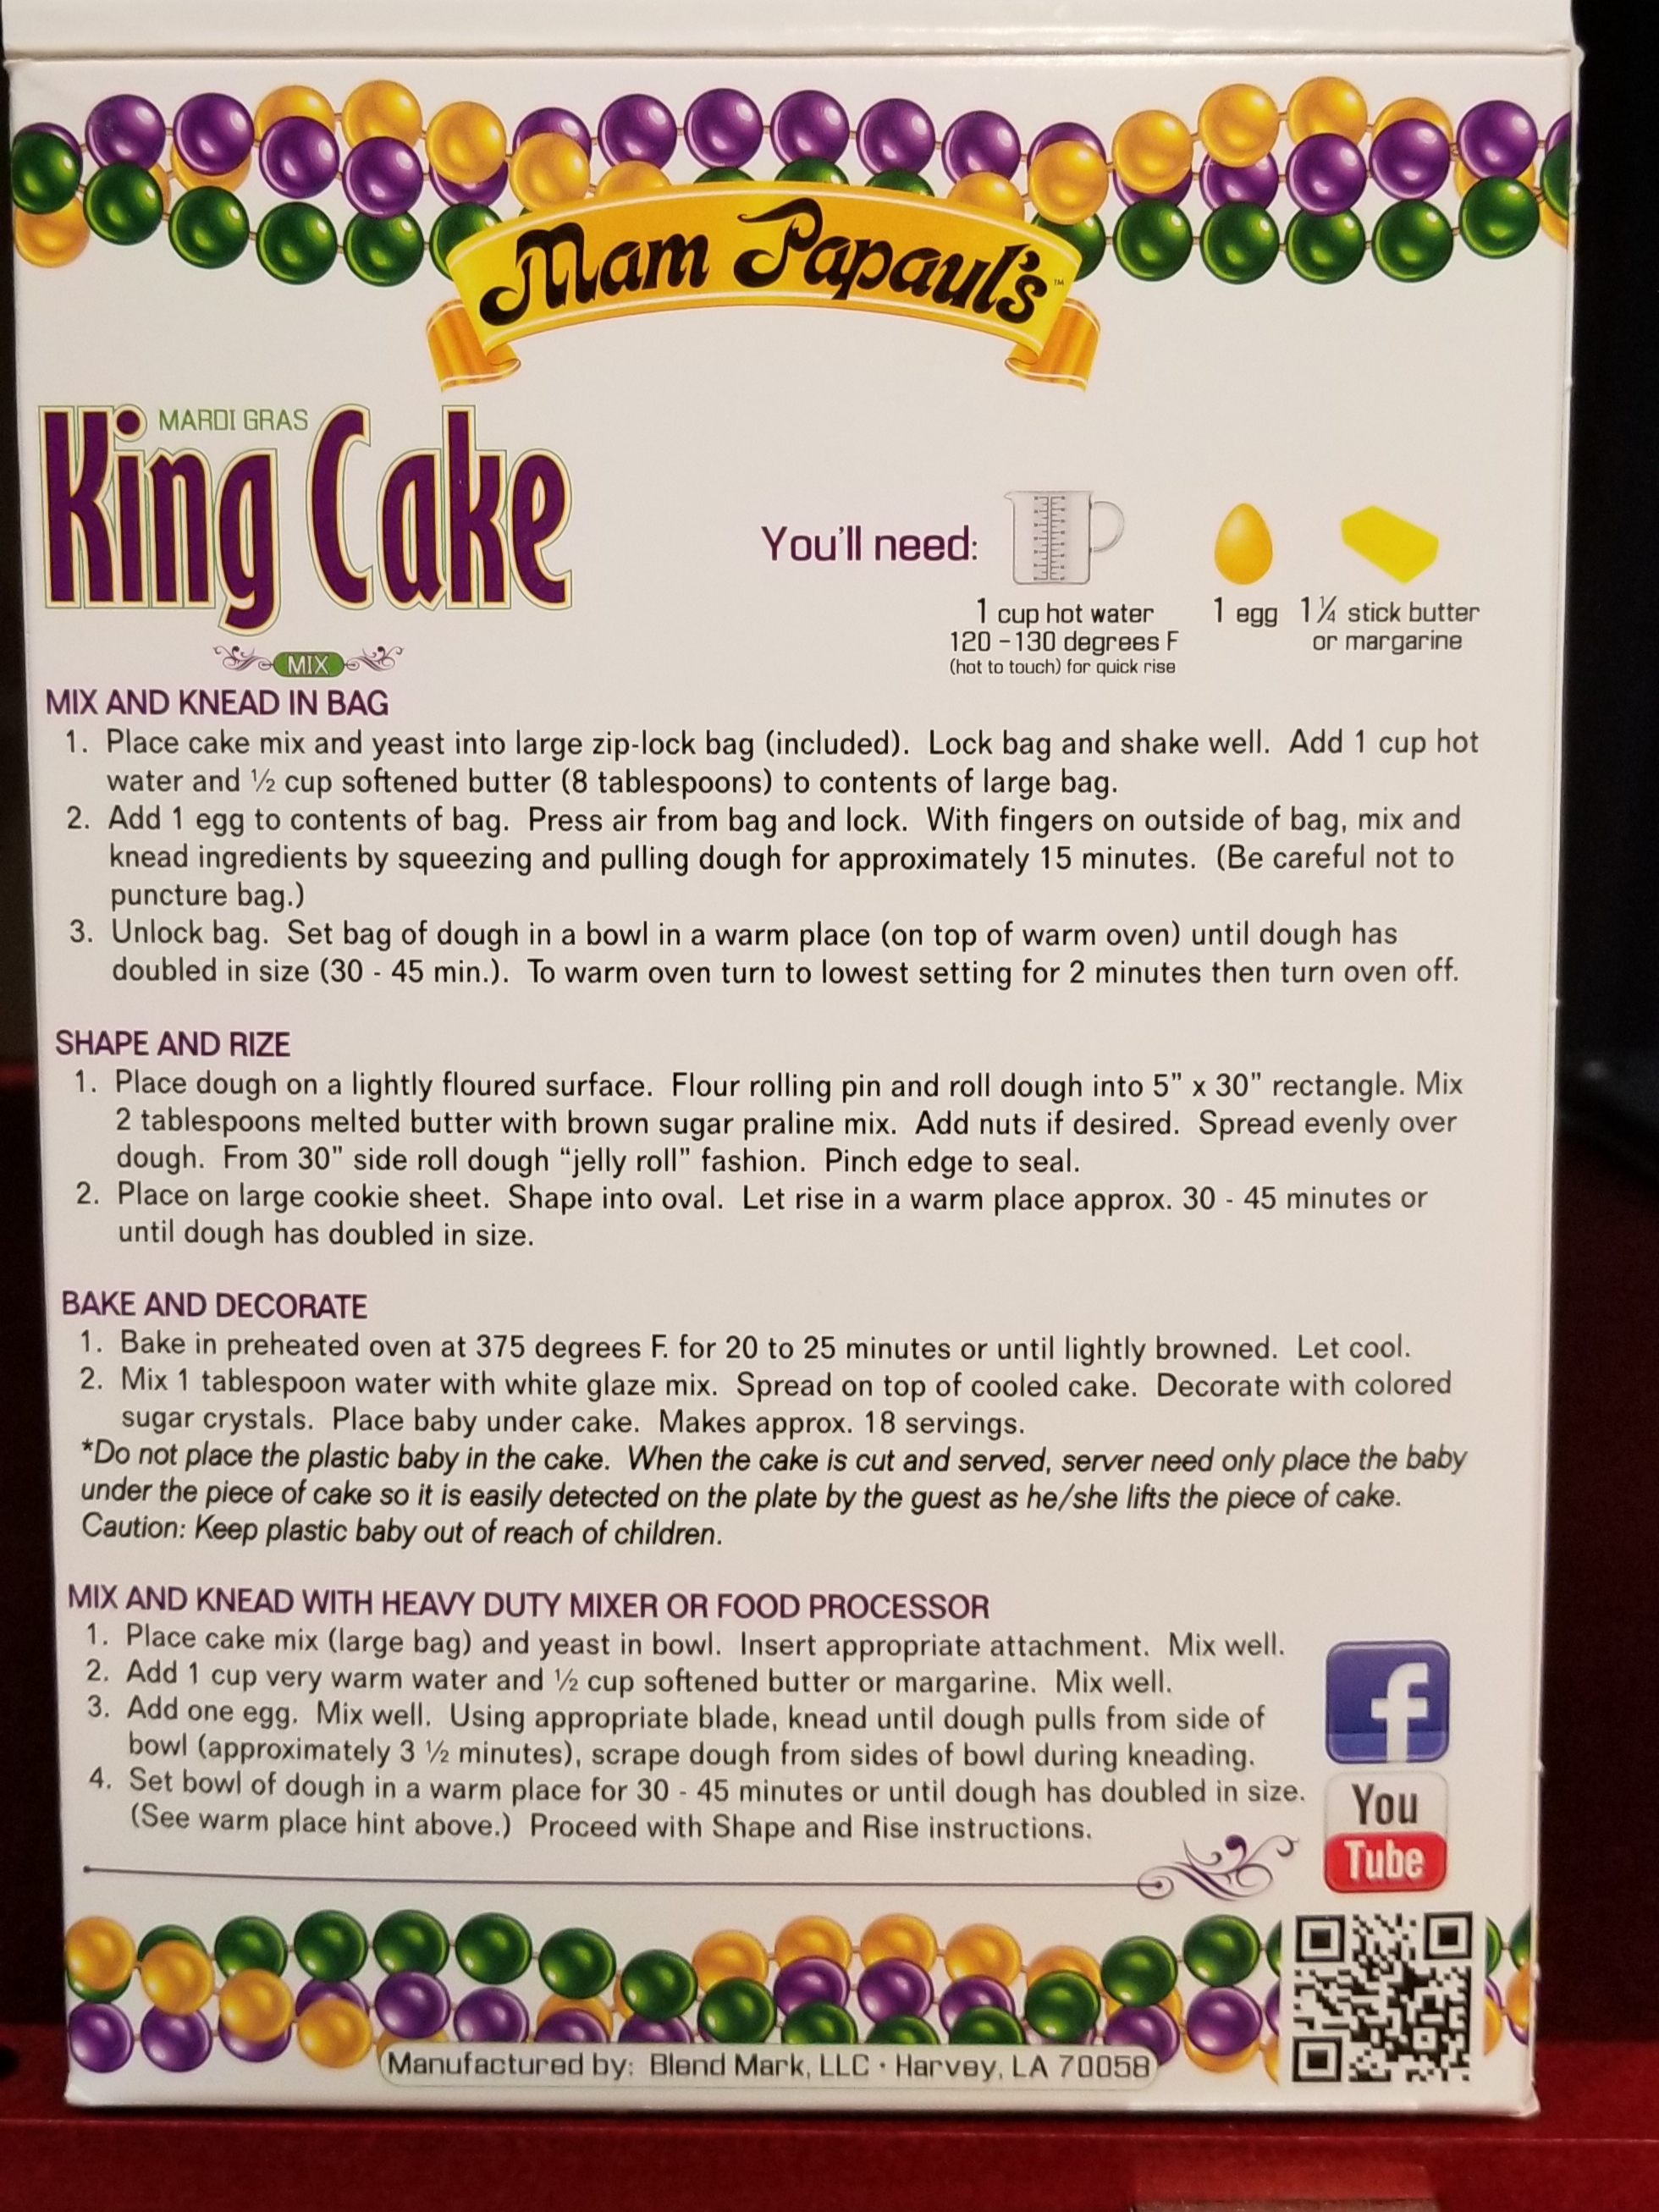
Let cool and decorate.

Creating a Christmas Tree with Tinkercad

In 2020, I haven’t painted much, nor have I drawn much. Most of my time being creative was spent in Tinkercad. I used Tinkercad to create a replicate of the Houmas House. I have created many building for my Railroad Town. Other designers are asking “How?” or “Teach me!” Since it is Christmas Time, I decided to provide instructions on how I created a Christmas Tree using Tinkercad. The instructions on instructable: https://www.instructables.com/Designing-a-Christmas-Tree-With-Tinkercad/. Or you can watch the video:

Yes, I also created an angel to go on top of the tree.

You need to watch to video to see how I created the Angel.

Art of Concentration: Day 8

I must be crazy for drawing so many lines on a page and than coloring them.  And, on top of it all, doing two drawings.  I must be crazy.  However, they were so much fun.

That is probably another rule of Art of Concentration – have fun.  Enjoy what you are doing.

The Art of Concentration rules are:

  1. Draw lines on a page.  Circles, squares, squiggly lines, it does not matter.
  2. Color every other section.  Start anywhere.  Use any color.
  3. If you desire, use multiple colors.  Sections of the same color can not touch.

The first drawing was a small drawing.  It has a simple flower in the middle with a bunch of lines going through it.

AofC flower x-treme

There are some many colors that could be added to this line drawing.  The first example started out as a simple black and white, but I could not leave it as that.  The gray background the flower jump off the page.

flower x-treme color 1

The colored version is very busy, it draws your eye all around the drawing.  It reminds me of a out country kitchen pattern.

flower x-treme color 2

Below is the hand drawing of the x-treme flower.  It was done on a Studio Series Artist tile with Faber Castell Pitt Pens and Crayola markers.

20180408_085910.jpg

Boxed Flower

Even though this Mandala started out as a sketch, I thought I could not do it justice on paper, so I put it in Corel Draw, increase the size to 8.5″ squared, and drew circles to the extreme.

AofC Mandala

From the center, a beautiful flower appeared.  There are so many way this could be colored, so many possibilities.  After creating a bitmap and using Microsoft Paint to color it, below is the results at my first attempt to color the Mandala.  The black background made the color more vibrant.

AofC Mandala color 1

AofC Mandala

PDF versions of the today’s line drawings are available on the Coloring Page for downloading.  Starting with today, I will put the newest drawings at the top of the page.

Art of Concentration: Day 7

Sometimes, with art, you need to break the rules to create amazing pieces.

The Art of Concentration rules are:

  1. Draw lines on a page.  Circles, squares, squiggly lines, it does not matter.
  2. Color every other section.  Start anywhere.  Use any color.
  3. If you desire, use multiple colors.  Sections of the same color can not touch.

The extreme line drawing.

AofC x-treme

Rule three does not work for black and white drawings.  If  you follow the line from the bottom right corner to the center, there are occurrences of one section touching two sections.    It may be more obvious on the black and white example below.  Even though the rule is broken, you still can get lost in the drawing, or dizzy.

AofC x-treme color 1

To follow the rule, I used multiple colors on the one below.

AofC x-treme color 2

This is the original had drawing done on a black Studio Series Artist Tile with Sakura pens.

20180407_091855.jpg

The X Divides

Click here for a PDF version of the line drawing.   It is also available on the Coloring Page.

Christmas Ornaments – Part 1

Around this time of the year, I work on something that has a Christmas theme.  This year I have painted some wooden Christmas ornaments.   Most of the ornaments were purchased from Michael’s Craft Stores in Oklahoma, Texas, and Louisiana.

The bell ornaments were painted with multiple layers of red and green acrylic paint.

For all the ornaments, I selected the DecoArt Americana Acrylic paint because it is thicker then most paint and covers better.  I used Delta Creamcoat for the gold metallic paint.  Then I covered the ornaments with Delta Creamcoat Sparkle Glaze.  The ornament probably didn’t need to be varnished after the glaze, but I wanted a good high gloss finish, so I put several coats of Miniwax Polycrylic on them.  The Polycrylic has worked well on my polymer clay creations.

The snowflake ornaments, yes there are two of them, the base was painted  with sapphire and then dry brushed with white paint.  I left the edges unpainted because I thought it gave them an old fashioned look.

The angel ornaments were purchase at Hobby Lobby.

I selected yellow and green paint for the star ornaments.  Before I applied the glaze, the green areas was dry brushed with gold paint.

The tree and bell ornaments were painted using the same process as described above.

The angel ornaments were purchased at Hobby Lobby.  I should have taken time to sand these ornament, because there are a few rough places on them.

This post is Part 1 because there are more ornaments that are unfinished.