Art of Concentration: Day 9

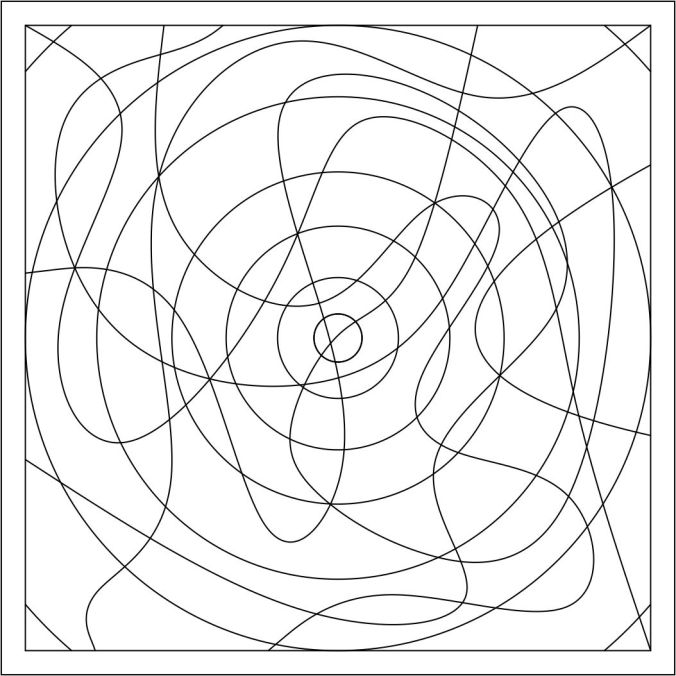
Today’s Art of Concentration drawing is more typical of the drawing I used to do in meetings and classes.  It wasn’t anything too complicated, just some lines and occasionally other objects.

Remember you can do these types of drawing on any size of paper from “Post-It” note size to letter size, or larger.  If you create them using ruled paper, you already have some lines premade.
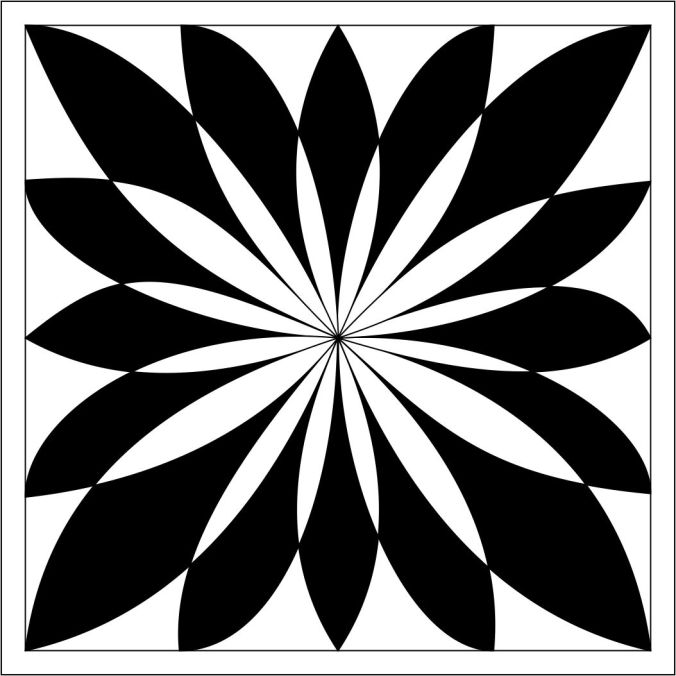
The line drawing:

AofC flower mess

The Art of Concentration rules are:

  1. Draw lines on a page.  Circles, squares, squiggly lines, it does not matter.
  2. Color every other section.  Start anywhere.  Use any color.
  3. If you desire, use multiple colors.  Sections of the same color can not touch.

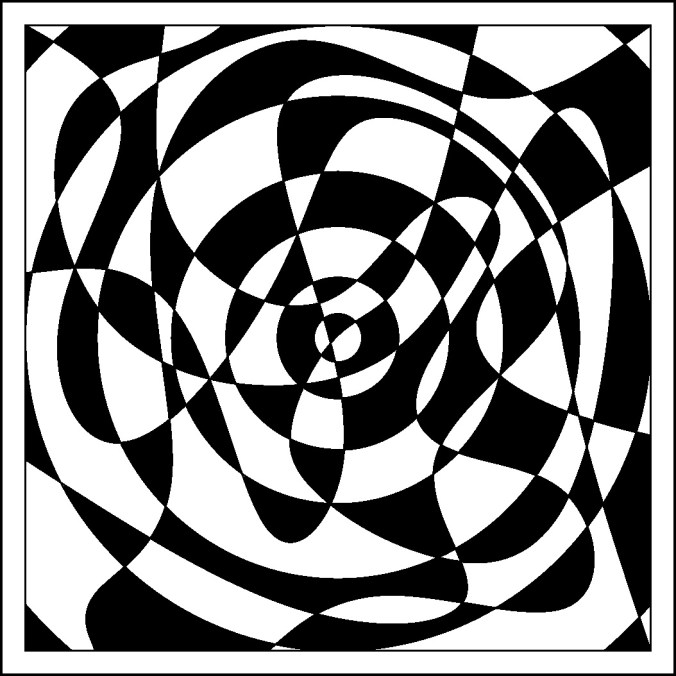
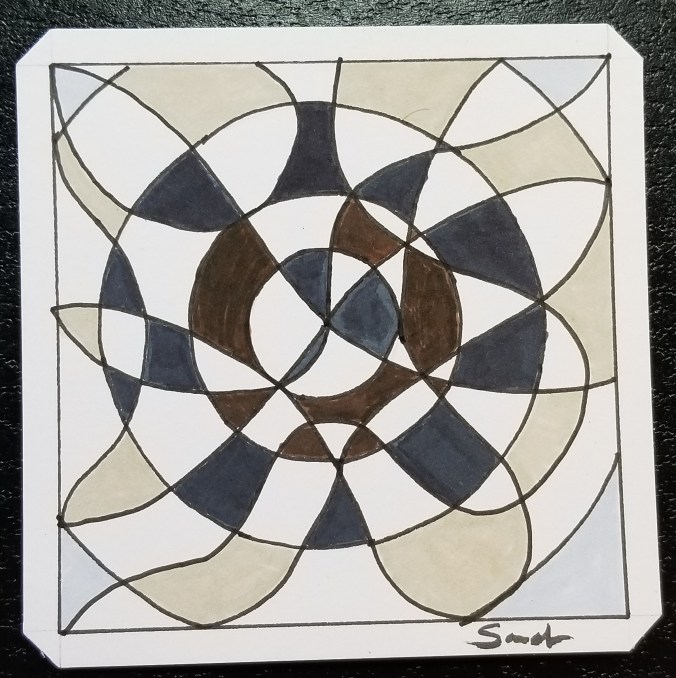
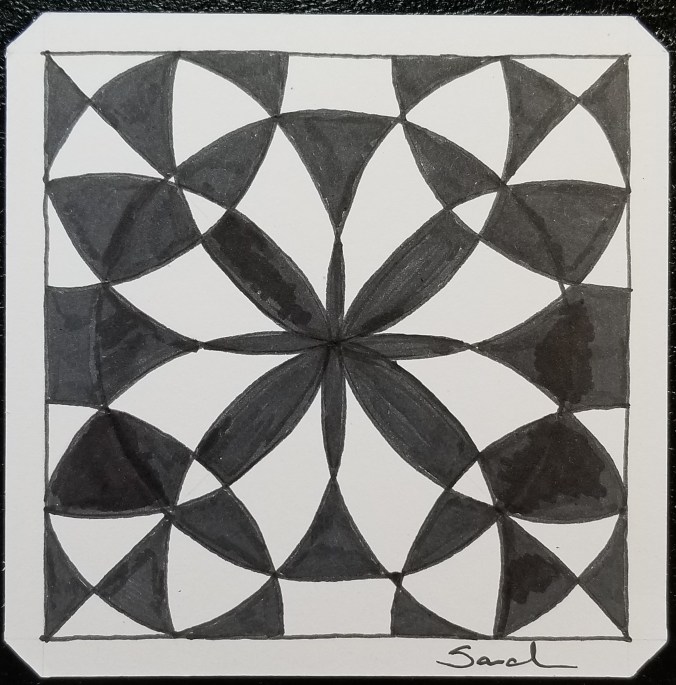
The first object created was the flower and than squiggly lines added.  Notice the top left of the circle in the middle of the page.  There are more than two section that are touching.  The rule “Section of the same color can not touch” will not work here.  To solve that dilemma, I used multiple colors.

AofC flower mess color 1 The flower petals were done in a deep red and white.  The center and background was done in black and white.   It doesn’t even look like a circle.  That is why I named today’s hand drawing “Squid”.  Looking at if after is was done, it looked more like a squid then a flower.
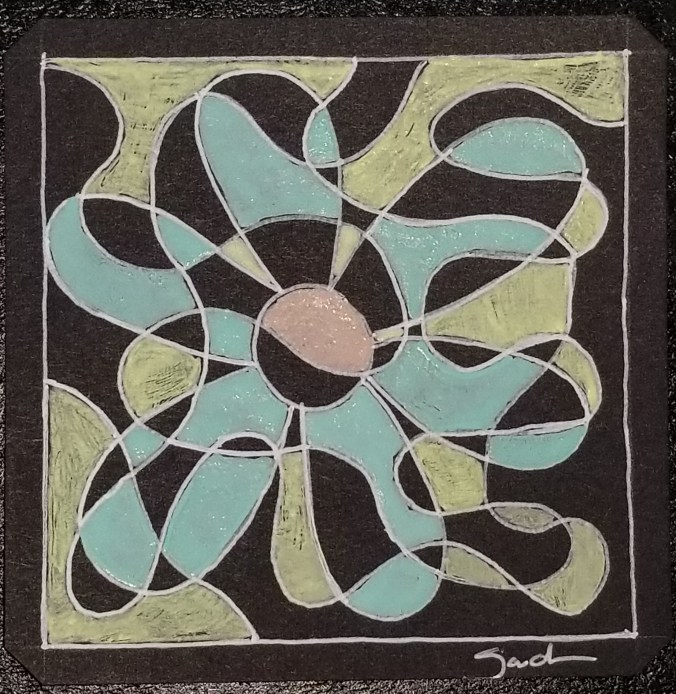
20180409_135311.jpg

Squid

Squid was done on a black Studio Series Artist tile using Sakura gel pens.

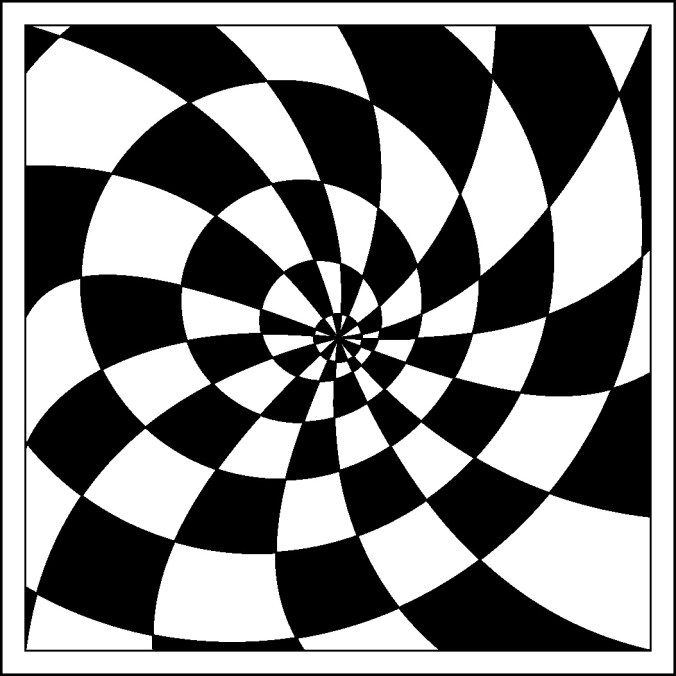
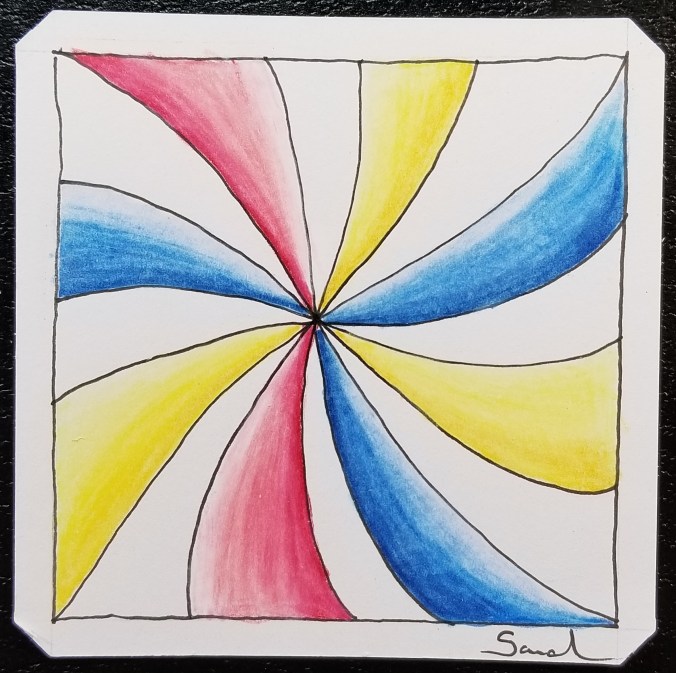
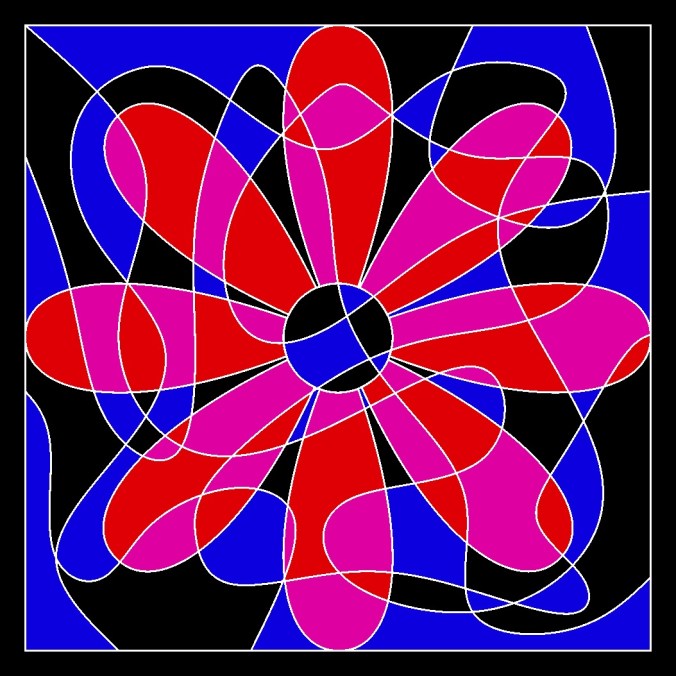
The line drawing was done in Corel Draw and exported as a bitmap to color using Microsoft Paint.  I decided to use three colors and black on the second drawing with white line.

AofC flower mess color 2

Click here to download a PDF version of the line drawing.  All of the line drawing are available on the Coloring Page.

Art of Concentration: Day 6

The ability to create something beautiful is a wonderful experience.

The Art of Concentration rules are:

  1. Draw lines on a page.  Circles, squares, squiggly lines, it does not matter.
  2. Color every other section.  Start anywhere.  Use any color.
  3. If you desire, use multiple colors.  Sections of the same color can not touch.

What started out as a page with a mess of lines, can turn into something beautiful.  Here is the line drawing from today.  If you look closely, you will see some circles.

AofC circle mess

First, the line drawing was colored using just black.

circle mess color 1

Next, I colored the line drawing using four colors.  Remember the rule, the same color can not touch each other.  If the colors were placed differently, it could had a completely different look.  See how different it looks from the black and white version.

circle mess color 2

Here is the hand drawn version:

20180406_091009.jpg

Circle Mess

Sometimes, when the black lines gets close, you will need to assume the blank space between the lines, e.g. lower right corner.

Click here for to download a PDF version of the line drawing.  PDF copies of the line drawings are available on the Coloring Page.


Art of Concentration: Day 5

Take a look at the Circle and Swirl line drawing shown below.  This drawing presents an optical illusion.  Why?  The circles appear to be ovals.  They are circles which are drawn off center from each other that gives the illusion.

AofC circle swirl 2

The Art of Concentration rules are:

  1. Draw lines on a page.  Circles, squares, squiggly lines, it does not matter.
  2. Color every other section.  Start anywhere.  Use any color.
  3. If you desire, use multiple colors.  Sections of the same color can not touch.

AofC circle swirl 2 color alt1

I normally do not color in the order as shown in a rainbow.  I normally color using the color wheel.   I will pick a color. Sometimes I go around the color wheel, at other times I will go across the color wheel (complementary colors).  Sometimes my colors are in harmony and sometimes they are contrasting.

On the Circle and Swirl line drawing I used colors that were next to each other on the color wheel.  Except for black.  Black is not a color, black lacks light and color.

AofC circle swirl 2 color alt2

With this hand drawing, I did not break rule 3.  None of the same color sections are touching.  It was done on a Studio Series Artist Tile using Sakura Gel Pens.  Colored with Prismacolor pencils.

20180405_080401.jpg

Color Goes Round

Click here to download a PDF copy of today’s Circles and Swirl.  It is also available on the Coloring Page.

Art of Concentration: Day 3

All tasks requires some form of concentration, even tasks that are habits like eating.  If your concentration dips while eating, you may drop your fork or bite yourself.  With art, if you get distracted while creating your master piece, you may pick up wrong color or apply color to the wrong spot. While it is true, there are no mistakes in art.  There are things we would really like to hide.

Today’s Art of Concentration is the double swirl.  One swirl it going clockwise, the other swirl is going counter clockwise.  It maybe a little more complicated then yesterday’s swirl.  Yes, it does look like a flower.

The rules are:

  1. Draw black lines on a page.  Circles, squares, squiggly lines, it does not matter.
  2. Color every other section.  Start anywhere.
  3. If you desire, use multiple colors.  Sections of the same color can not touch.

The line drawing created in Corel Draw:

AofC swirll 2

Double Swirl colored:  Notice is this example I started with the tips.

AofC swirll 2 Color Alt 2

This drawing shows a different starting point, along the edge.  Even though, both have identical line drawings, they have a different feel.

AofC swirll 2 Color Alt 1

The hand drawing of the Double Swirl, created on a Studio Series Artist Tile using Sakura gel pen.

20180403_071753.jpg

Double Swirl

Click here to download a pdf line drawing of the double swirl. It is also available on the Coloring Page.

The Art of Concentration: Day 2

Today, I selected an easier design (The Spiral) for my “Art of Concentration” project.  The rules for designing and coloring the drawing is simple:

The rules are:

  1. Draw black lines on a page.  Circles, squares, squiggly lines, it does not matter.
  2. Color every other section.
  3. If you desire, use multiple colors.  Sections of the same color can not touch.

Since the outline was simple, I decided to use some shading.

Created and colored by hand using Pigma Micron pen and Prismacolor pencils:

20180402_130235.jpg

The Swirl

The outline created on the computer using Corel Draw:

AofC spiral

The drawing colored in Corel Draw.  I did not use Microsoft Paint today to color the drawing, because I like the gradient done in Corel Draw.

color of spiral

For a copy today drawing, The Spiral, click here.  You may also for this and other drawings on the Coloring Page.

The Art of Concentration: Day 1

For many years, I did not doodle in meeting.  I did not doodle in classes.  I did not doodle in my spare time.  What I did, was grab a piece of paper (any size) draw some black lines on a page, and color every other section on the page until the page was full.  During computer classes, I would open up Microsoft Paint and do the same thing.

Some people may call it OP Art, Optical Art.  I never got that detail.  I never tried to create an optical illusion.  It just was lines on a page.  It was like a game.  If helped me from falling asleep in meetings and classes.  I could do this task and still pay attention to what was going on around me.  In computer classes, the people sitting behind me would watch my monitor as I was creating a piece.  Microsoft Paint was always installed on the computers, even if games or the internet was not.

The rules were:

  1. Draw black lines on a page.  Circles, squares, squiggly lines, it did not matter.
  2. Color every other section
  3. If you were brave, use multiple colors.  Sections of the same color not could touch.

I am going to try over the next few days to repeat this experiment.  I am going to call it the Art of Concentration.  Even though, this art work sound simple enough, it requires concentration.  You have to figure out what section to color.  If you lose concentration, you may color the wrong section.

Today’s piece, I thought is was something simple.  Wrong!

20180401_080146.jpg

Now to color every other section:  Where did I go wrong?

20180401_083927.jpg

Flower Madness

To figure it out, I created the line drawing in Corel Draw and created a bitmap.

AofC Flower BMP

I opened the line drawing in Microsoft Paint and colored the page.  Paint vs. paper – if you mess up in Paint, you can correct it.

AofC Flower

If you would like to try coloring the page, I have created a PDF.  Click Here.  You do not have to color the same section that I colored, just pick a section to start.

You can also find it on my newly created Coloring Page.

3D Printing – The Easter Egg

Yesterday, I designed an Easter Egg using Tinkercad.  Today, I printed the Easter Egg.  Creating the Egg in Tinkercad is easy.  They have a egg object.  Hollowing out the egg is easy; copy egg, reduce the size, make it a hole, align the solid egg with the hole egg, and group.

20180329_154702.jpg

Making the two egg halves with the crack was more complicated than making the chick.  The chick is two circles for the body, two circles for the eyes, two flatten and stretched trapezoid for the wings, the heart shape for the head, and Tinkercad’s  chicken foot object for the feet.

To see how I created the crack in the egg, check it out here.  Note:  I am working on other cool chicks, so the design my change.

20180329_154747.jpg

I probably could have made the chicken bigger, maybe I will.

20180329_154733.jpg20180329_154756.jpg

The egg was printed on Ultimaker 2+ printer.  I read that beta version of the Cura Software allows more control over supports.  Yay!

Tinkercad – the free, online 3D CAD app

Clackers

It all started on Facebook and someone saying “Do you remember…”  Yes, I do remember Clackers, they were fun to play with, but dangerous (will at least in today’s world.)  We would get hit with one or both of the glass balls and go ouch or whoops.  However, in today’s world, they are safer than the Tide Pod challenge.

My 3D printer and I were not getting along, so we both took a break from each other.  After the Facebook posting, I decided it was time to put the print back to work.  And, one of the simplest thinks to design and print would be a ball with at hole in the middle.

I used Tinkercad to design it.  5cm ball with a hole in the middle.  I then did the thing I been regretting for a while, I cleaned, oiled and balanced the printer.  The first print failed, the item was not adhering to build plate.  Failure.  I rebalanced the build plate.  Failure.  I removed the build plate and cleaned it with soap and warm water and rebalanced the build plate.  Success, I had one ball for my clackers, so I printed a second one.

The string is only nylon string with a loop tied at the top and a knot at the end of each ball.

My family have official declared me weird.


Stand For Fluid Painting

Fluid Painting can be messy.  You pour paint over the canvas and it drips over the edges.  What a mess!  I am not a clean freak, just a person working in limited space and I need my table to draw and do other things.  So far, I have limited myself to 4″ canvases, and I have a 3D printer sitting right next to my work table… I decided I would design and print a stand for my pour paintings.

The maximum print size of my Ultimaker 3d printer is around 8 inches, width and length.  The height can go up to around 12 inches.  So, this project was perfect.

The catch basin is 5″ square, or in my design world 127mm, and 1″ (25.4mm) high.  Just in case different colors dropped from the different edges of the canvas, I divided off the catch basin and add drain notches.  It didn’t need it, but I placed pegs to hold the stand, and divided off this compartment to keep paint off of the stand.  It took around 11 hours to print.

20180228_134813.jpg20180228_134849.jpg

The design was done in Tinkercad and export as a STL file.  The file was imported into Cura and where a .gcode file was made.  I used the “normal” setting because the “fine” setting indicated it would take 23 hours to print.  Therefore, some warping occurred because of the setting and because I select not to add a Brim support.

The stand was also designed in Tinkercad.  It is 3 inches high.  The break in the structure allows for air to flow under the canvas.  It took around 4 hours to print.

20180228_134859.jpg

The notches on top of the stand, allows me to put some other type of support under the canvas to lift off, in case I want to reuse the stand before drying is complete.

20180228_135052.jpg

The finished product.

20180228_135154.jpg20180228_135305.jpg20180228_135345.jpg

The colors, yes I used Color Shift paint by Folk Art and grab the black and 4 other colors.

20180228_150626-2.jpg

The test.

Ok, some of the holes leaked.  The center dividers should have been larger and I did not pour out of the basin as I expected.  I do not know if I am going to tweak the design and reprint it or not.  Probably.

20180228_153210.jpg

I did get a cup (one ounce) out of the basin.  It should go nicely with another pour.

20180228_154257.jpg